
Classic Sugar Cookies with Icing – Best Decorating Tips
There’s something magical about baking. The smell of fresh cookie dough filling your kitchen, the anticipation of pulling a golden batch from the oven, and the joy of adding your personal touch with decorations. It’s a moment of creativity and warmth that brings people together.
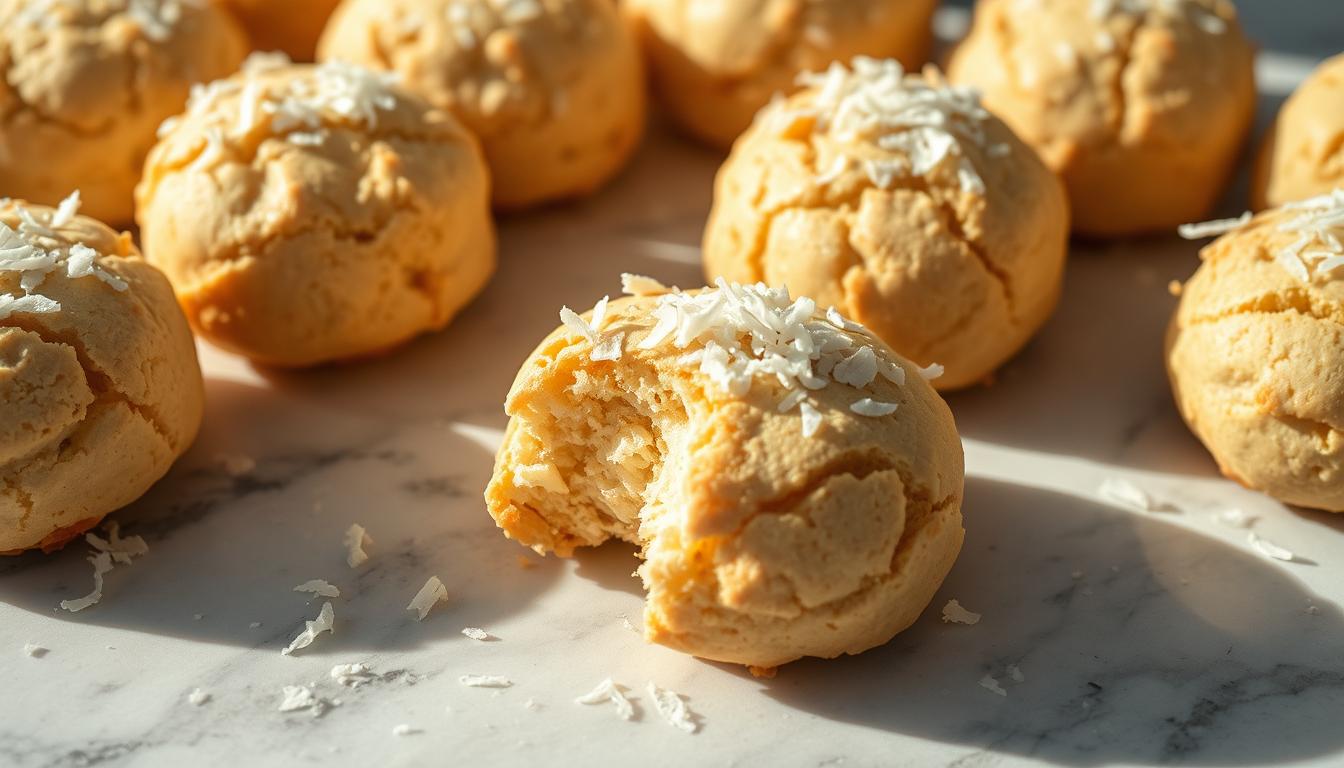
These treats are not just delicious; they’re a canvas for your imagination. With the right baking sheet and a simple recipe, you can create soft, chewy delights with crisp edges. Adding royal icing transforms them into edible art, perfect for any occasion.
Whether you’re a seasoned baker or just starting, this guide will help you master the basics. From ingredient precision to decorating techniques, you’ll learn how to make every bite as delightful as it looks.
Key Takeaways
- Discover a simple recipe for soft, chewy treats with crisp edges.
- Learn the importance of using the right baking sheet for even baking.
- Explore how royal icing can elevate your decorating game.
- Understand the role of precise ingredient measurements in baking.
- Gain expert tips to make your creations stand out.
Introduction to Classic Sugar Cookies with Icing
The art of baking transforms simple ingredients into something extraordinary. When it comes to creating treats that are both delicious and visually stunning, few things compare to the charm of sugar cookies with icing. These baked delights are more than just a snack; they’re a celebration of creativity and flavor.
One of the secrets to achieving the perfect texture lies in using ingredients at room temperature. This ensures that your dough blends smoothly, resulting in a soft, chewy treat with just the right amount of crispness. Whether you’re a beginner or a seasoned baker, this step is crucial for consistency.
The balance between sugar and icing is what makes these cookies truly special. The sweetness of the dough pairs perfectly with the smooth, creamy finish of the icing, creating a harmonious blend of flavors. It’s this combination that turns a simple cookie into a festive masterpiece.
What makes these treats even more appealing is their decorative potential. From holiday themes to birthday parties, the possibilities are endless. With a little creativity, you can turn each cookie into a unique work of art that’s as delightful to look at as it is to eat.
Popular recipes often showcase the versatility of these cookies. Whether you’re using vibrant colors, intricate designs, or simple patterns, the end result is always a crowd-pleaser. This introduction sets the stage for everything that follows, guiding you through the process of making and decorating these timeless treats.
Understanding the Perfect Sugar Cookie Dough
Mastering the art of baking starts with understanding the foundation of great dough. The texture, spread, and overall quality of your baked goods depend on the precise balance of ingredients. Whether you’re following a tried-and-true recipe or experimenting with your own, knowing the science behind the dough is essential.
The Role of Ingredients in Texture
Every ingredient in your cookie recipe plays a specific role. Flour provides structure, while butter adds richness and helps create a tender crumb. Sugar not only sweetens but also affects the spread and browning of your dough. Eggs bind everything together, adding moisture and stability.
Understanding these roles ensures your dough has the perfect balance of softness and structure. Too much flour can make it dry, while too much butter can cause excessive spreading. Precision is key to achieving the ideal texture.
How Butter, Sugar, and Eggs Work Together
The interaction between butter, sugar, and eggs is what transforms your dough into a masterpiece. Creaming butter and sugar together incorporates air, which helps the dough rise slightly during baking. Eggs add moisture and act as a binding agent, ensuring your dough holds its shape.
Experienced bakers know that overmixing can lead to tough dough. Mix just until the ingredients are combined to maintain a soft, tender texture. This careful balance ensures your dough is easy to work with and bakes evenly.
By mastering these techniques, you’ll create dough that’s not only delicious but also a joy to decorate. The right foundation sets the stage for stunning, flavorful treats every time.
Essential Tools and Ingredients for Baking
Baking is a blend of science and creativity, where tools and ingredients play a vital role. Having the right equipment and quality components ensures your efforts yield delicious results. Whether you’re a beginner or a seasoned baker, this guide will help you stock your kitchen for success.
Must-Have Baking Tools
Every baker needs a set of reliable tools to streamline the process. A stand mixer or hand mixer saves time and effort, especially when combining ingredients. A rolling pin is essential for shaping dough evenly, while baking sheets ensure even heat distribution for perfect results.
Other indispensable items include measuring cups and spoons for precision, silicone mats to prevent sticking, and cooling racks to maintain texture. Investing in quality tools not only makes baking easier but also enhances the final product.
Key Ingredients Explained
Ingredients are the building blocks of any recipe. Flour provides structure, while vanilla adds depth and aroma. Using ingredients at room temperature ensures smooth mixing and consistent texture.
Every minute of preparation counts. Measuring accurately and handling ingredients with care can make a significant difference. For example, sifting flour prevents lumps, and using fresh vanilla extract enhances flavor.
| Tool | Purpose |
|---|---|
| Stand Mixer | Efficiently combines ingredients |
| Rolling Pin | Shapes dough evenly |
| Baking Sheets | Ensures even baking |
| Measuring Cups | Provides precise measurements |
| Silicone Mats | Prevents sticking |
Step-by-Step Guide to Making Your Dough
Creating the perfect dough is a rewarding process that combines precision and patience. Follow these steps to ensure your dough is smooth, consistent, and ready for baking.
Mixing and Combining Ingredients
Start by gathering all your ingredients at room temperature. This ensures even mixing and a smooth texture. In a large bowl, cream together butter and sugar until light and fluffy. Add one egg at a time, mixing well after each addition. This step is crucial for binding the dough.
Next, incorporate your extract for flavor. Vanilla is a popular choice, but almond or lemon can add a unique twist. Gradually add the dry ingredients, mixing just until combined. Overmixing can lead to tough dough, so handle with care.
Forming and Chilling the Cookie Log
Once your dough is mixed, divide it into manageable portions. Shape each portion into a log, about 1.5 inches in diameter. Wrap the logs in plastic wrap and refrigerate for at least 1 hour. Chilling is essential to maintain shape and prevent spreading during baking.
Chilling also enhances the flavor by allowing the ingredients to meld together. If you’re short on time, you can freeze the dough for 20-30 minutes. Just ensure it’s firm enough to slice before baking.
“Chilling the dough is a game-changer. It makes slicing easier and ensures your baked goods hold their shape.”
| Step | Key Tip |
|---|---|
| Mixing | Add eggs one at a time for even binding. |
| Flavoring | Use extracts like vanilla or almond for depth. |
| Chilling | Refrigerate for at least 1 hour for best results. |
By following these steps, you’ll create dough that’s easy to handle and perfect for baking. The right techniques ensure your food creations are as delightful as they look.
Baking Techniques for Soft, Chewy Cookies
The secret to soft, chewy treats lies in precise baking techniques. From temperature control to timing, every detail matters. Using the right tools and paying attention to subtle cues can make all the difference.
Temperature and Timing Essentials
Using the correct bowl and sheet ensures even baking. A heavy-duty sheet prevents hot spots, while a non-reactive bowl keeps ingredients stable. Preheat your oven to the exact temperature specified in your recipe for consistent results.
Timing is equally important. Overbaking can dry out your treats, while underbaking leaves them too soft. Look for slight color changes around the edges as a cue. A golden hue indicates they’re ready to come out of the oven.
Here’s a quick tip: Rotate your sheet halfway through baking for even browning. This simple step ensures every piece is perfectly baked. By mastering these techniques, you’ll achieve a soft, chewy texture every time.
Tips for Rolling and Shaping the Dough
Rolling and shaping dough is a skill that transforms your baking results. Whether you’re aiming for uniformity or intricate designs, the right techniques make all the difference. With a few expert tips, you can achieve professional-looking results every time.

Keeping the Dough Manageable
Start by ensuring your dough is at the right consistency. Using a measured cup for ingredients helps maintain balance. Work in a room with a controlled temperature to prevent the dough from becoming too sticky or firm.
Quick and efficient handling is key. If the dough starts to stick, lightly dust your surface and rolling pin with flour. This prevents it from tearing and ensures smooth rolling. Take your time to achieve the desired thickness for even baking.
Here’s a pro tip: Chill the dough for 10-15 minutes before rolling. This makes it easier to handle and helps maintain the perfect shape. By following these steps, you’ll create dough that’s ready for any decorating technique.
Achieving Uniform Shapes
Consistency is crucial for professional results. Use a ruler or guide to ensure each piece is the same thickness. This not only improves appearance but also ensures even baking. For round shapes, a cup or cookie cutter works wonders.
If you’re working with intricate designs, roll the dough slightly thicker to prevent breakage. Smooth edges and clean lines are easier to achieve when the dough is firm but pliable. Patience and precision are your best tools here.
Remember, practice makes perfect. The more you work with dough, the better you’ll become at shaping it. These techniques will elevate your baking and make every piece a masterpiece.
Baking and Decorating: Classic Sugar Cookies with Icing
The key to flawless baking lies in understanding the nuances of temperature and technique. Achieving a soft center with slightly crisp edges requires precision and attention to detail. Start by ensuring your oven is preheated to the correct temperature for even baking.
Rolling your dough to the right thickness is crucial. Aim for about an inch thick to maintain the perfect texture. This ensures your baked goods hold their shape while staying tender inside. Use a ruler or guide to achieve uniformity for consistent results.
- Chill your dough for at least 30 minutes before rolling. This makes it easier to handle and prevents sticking.
- Lightly flour your surface and rolling pin to avoid tearing the dough.
- Cut shapes with sharp cookie cutters, pressing firmly for clean edges.
- Transfer cutouts to a baking sheet, spacing them evenly to allow for slight spreading.
Proper temperature control during baking is essential. Rotate your baking sheet halfway through to ensure even browning. Look for a light golden color around the edges as a sign they’re done. Let them cool completely before decorating for the best results.
By mastering these techniques, you’ll create baked goods that are as delightful to look at as they are to eat. Precision and patience are your best tools for success.
Crafting the Perfect Icing
Perfecting your icing skills can elevate your baked creations to a whole new level. The right icing not only adds flavor but also transforms your treats into edible art. Whether you prefer buttercream or royal icing, mastering the techniques ensures your results are both beautiful and delicious.
Choosing Between Buttercream and Royal Icing
Buttercream is known for its creamy texture and rich flavor. It’s easy to spread and perfect for adding vanilla extract for a subtle aroma. Royal icing, on the other hand, dries hard and is ideal for intricate designs. Both options have their unique advantages, so your choice depends on the look and feel you want to achieve.
| Type | Best For |
|---|---|
| Buttercream | Soft, creamy finishes |
| Royal Icing | Detailed, hard designs |
Coloring and Spreading Techniques
Adding color to your icing can make your creations pop. Use gel food coloring for vibrant shades without altering the consistency. When spreading, work quickly to ensure smooth, even layers. Timing is key—let the icing set slightly before adding sprinkles or other decorations.
- Mix colors gradually to achieve the desired shade.
- Use a piping bag for precise application.
- Allow each layer to dry before adding the next.
By following these steps, you’ll create icing that’s both visually appealing and delicious. Whether you’re decorating for a special occasion or just for fun, these techniques will help you achieve professional results every time.
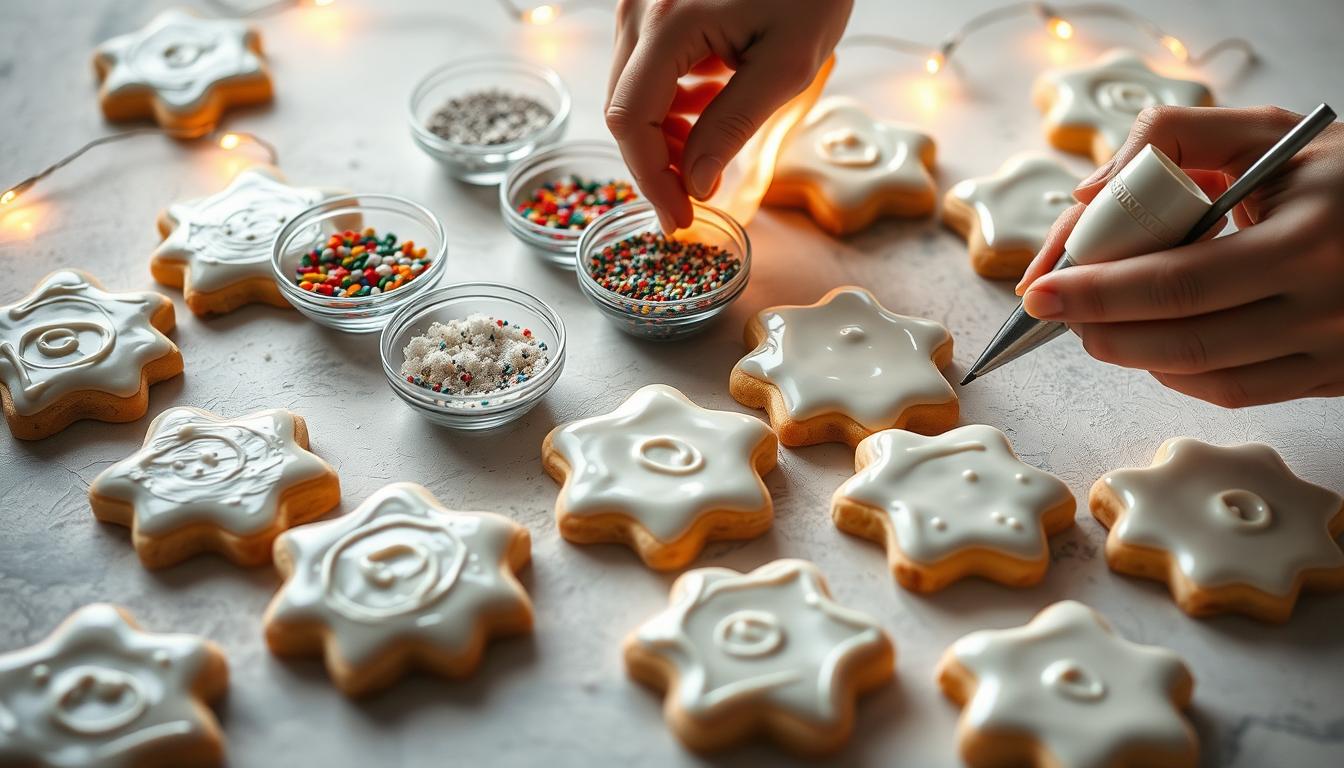
Creative Decorating Ideas and Trends
Decorating baked treats is where creativity truly shines. Whether you’re adding a sprinkle of color or crafting intricate designs, the possibilities are endless. Modern trends blend traditional techniques with innovative tools, making it easier than ever to create edible masterpieces.

Fun Sprinkles and Toppings
Adding sprinkles and toppings is a simple way to elevate your creations. Use a tablespoon to measure out colorful sprinkles for even distribution. A mixer can help blend icing to the perfect consistency for holding toppings in place.
Here are some popular options:
- Edible glitter for a shimmering effect.
- Mini chocolate chips for a crunchy texture.
- Crushed nuts for a rustic touch.
Seasonal and Themed Designs
Seasonal and themed designs are a great way to celebrate special occasions. Use a pin to etch intricate patterns into your dough before baking. Social media trends often showcase vibrant colors and geometric shapes, inspiring bakers to experiment with new ideas.
Here’s a quick guide to seasonal themes:
| Season | Design Ideas |
|---|---|
| Winter | Snowflakes, mittens, and snowmen. |
| Spring | Flowers, butterflies, and pastel colors. |
| Summer | Beach themes, suns, and tropical fruits. |
| Fall | Leaves, pumpkins, and warm tones. |
“Decorating is not just about looks—it’s about telling a story with every bite.”
By combining these ideas with your own creativity, you’ll transform simple treats into works of art. Whether you’re using a mixer, pin, or tablespoon, the right tools make all the difference.
Make-Ahead and Storage Strategies
Planning ahead can make your baking process smoother and more enjoyable. Whether you’re preparing for a holiday or a special event, storing your dough and baked goods correctly ensures they stay fresh and flavorful. With these expert tips, you’ll keep your creations at their best, ready to decorate sugar cookie designs whenever inspiration strikes.
Refrigeration and Freezing Tips
Refrigerating your dough is a great way to prepare in advance. Wrap it tightly in plastic wrap or place it in an airtight container to prevent drying. For longer storage, freezing is your best option. Divide the dough into portions, wrap each in paper or plastic, and store them in a freezer-safe bag. This method keeps the dough fresh for up to three months.
When it’s time to bake, thaw the dough in the refrigerator overnight. This ensures it maintains the right consistency for rolling and shaping. For baked goods, let them cool completely before storing. Use parchment paper to separate layers and prevent sticking.
Storing Baked Goods
To keep your baked treats fresh, store them in a large bowl or airtight container. Place a sheet of paper between layers to protect delicate decorations. This method works well for both short-term and long-term storage. For added freshness, consider using a slice of bread in the container—it helps maintain moisture without affecting the texture.
- Wrap dough tightly in plastic or paper before refrigerating or freezing.
- Use parchment paper to separate layers of baked goods.
- Store treats in a large bowl or airtight container to preserve flavor.
- Plan ahead by freezing dough for up to three months.
By following these strategies, you’ll always have fresh, delicious baked goods ready to decorate sugar cookie designs for any occasion. Proper storage not only saves time but also ensures your creations taste as good as they look.
Expert Pro Tips for a Flawless Finish
Elevate your decorating skills with expert techniques that bring precision and artistry to your creations. Whether you’re aiming for intricate designs or clean, professional finishes, these advanced tips will help you achieve perfection. From cutting to shaping, every step matters in creating edible masterpieces.
Advanced Decorating Tricks
Start by mastering the art of cutting your dough with precision. Use sharp tools to ensure clean edges, which are essential for intricate designs. Follow detailed instructions to replicate patterns or create your own unique styles. This level of accuracy sets the foundation for flawless decorations.
When it comes to decorate sugar creations, consistency is key. Use a piping bag for smooth lines and even layers. For complex designs, consider using printed templates as guides. These tools help you achieve professional results, even if you’re new to advanced techniques.
- Use stencils or templates for intricate patterns.
- Experiment with different piping tips for varied textures.
- Layer colors gradually for a polished, multi-dimensional look.
Push your creative boundaries by trying new methods. Combine techniques like stenciling and hand-painting for unique effects. With practice and patience, you’ll transform your baked goods into works of art that impress every time.
Conclusion
Baking is more than just a process—it’s a journey of creativity and precision. From mixing the perfect dough to adding the final touches, every step has a purpose. This guide has walked you through the essentials of a sugar cookie recipe, ensuring your creations are both delicious and visually stunning.
As you experiment with cookie icing, remember that patience and attention to detail are key. Whether you’re decorating for a special occasion or simply enjoying the process, let your creativity shine. Use this recipe as a foundation to explore new designs and techniques.
Baking is a blend of art and science, and with practice, you’ll master both. So, roll up your sleeves, gather your tools, and start creating. Your next batch of decorated treats could be your best yet!


One Comment
Comments are closed.